Scenario.
Citizens of the capital city of Andreivia, Tcherbevan, were awoken in the small hours of the morning by a series of explosions, thought by some to be a meteor – and by the tinfoil hat brigade to be a UFO – although the truth is even stranger.
The American espionage agency the NSA was deliberately
de-orbiting an aging Keyhole KH11 spy satellite for a soft landing in
Kazakhstan when it suddenly vanished from radar. Rather than Kazakhstan it ended up crashing
in Andreivia, damaged yet mostly intact – the impact of collision triggered
emergency release of drogue parachutes that slowed the terminal descent.
The Americans don’t know the location of their property, but they do
want it back! It has acquired critical
real-time intelligence data about Russian troop movements in the Baltic, stored
on a comparatively small (suitcase-sized) detachable memory module. The KH11 itself weighs well over 10 tonnes
and would need heavy plant to remove from the crash site.
Obviously anyone getting to the KH11 would be able to extract the memory
module, which is worth a considerable amount in ransom. Any G20 country would love to get their hands
on a KH11, damaged or not, as it would again be worth an entire monarchy’s ransom,
quite apart from the reverse-engineering opportunities …
You will find another great AAR of this game on Andy C's blog http://sedimentswargameblog.blogspot.co.uk/2016/04/crisis-point-2016-first-game.html
You will find another great AAR of this game on Andy C's blog http://sedimentswargameblog.blogspot.co.uk/2016/04/crisis-point-2016-first-game.html
Players.
Andy - NATO (British)
Ron - Russian
Stuart - Mujahedeen
Leo & Arthur - Andreivian Gov't
Umpire.
Richard P
Table 8' x 6'.
The table represented a remote area of the Eastern Hills. The British would enter top left and the Russians would enter top right. The Mujahedeen controlled the small village in the centre of the table and the Andreivian Government forces would enter later in the game via the road bottom left near the hills. The only player who knew the location of the KH-11 Satellite was the Mujahedeen Commander as he was on patrol when it crash landed. Any player with troops near the crash site had to make a Tac Roll to reveal its location. Players would need two vehicles in base contact with the KH-11 Satellite to allow them to tow it off the table.

The Eastern Hills

The objective, a crashed KH-11 Satellite
Game Report.
British - Infantry Platoon mounted in 5 Warrior's. 1 x HQ, 1 x Milan ATGM Team, 3 x Infantry Sections. Reserve - 1 x Challenger 1 MBT
Russian - VDV Platoon mounted in 3 BMD-1's. 3 x VDV Sections plus a T62 MBT. Reserve - 1 x T55 MBT and 1 x BRDM-1 A/C.
Andreivian - 2 x Infantry Sections mounted in T34 APC's and 2 x Chieftain MBT.
Mujahedeen - 3 x Mujahedeen Squads, 1 x Armoured Car, 1 x IS-3 MBT. Reserve - 2 x IS-3 MBT.

Only hours before the KH-11 Satellite crash lands an Andreivian Government Paramilitary unit patrols the Eastern Hills with nothing unusual to report they return to barracks.

Russian VDV with a T62 in support advance towards the level crossing.

Meanwhile on the other side of the table the British begin to deploy their forces.

On sighting the approaching forces the Mujahedeen quickly deploy their Armoured Car and IS-3 MBT in the village. The three infantry sections deploy one per building giving them an excellent field of fire.

British Infantry begin to fan out. One Warrior is sent towards the railway to report what the Russians are up to.

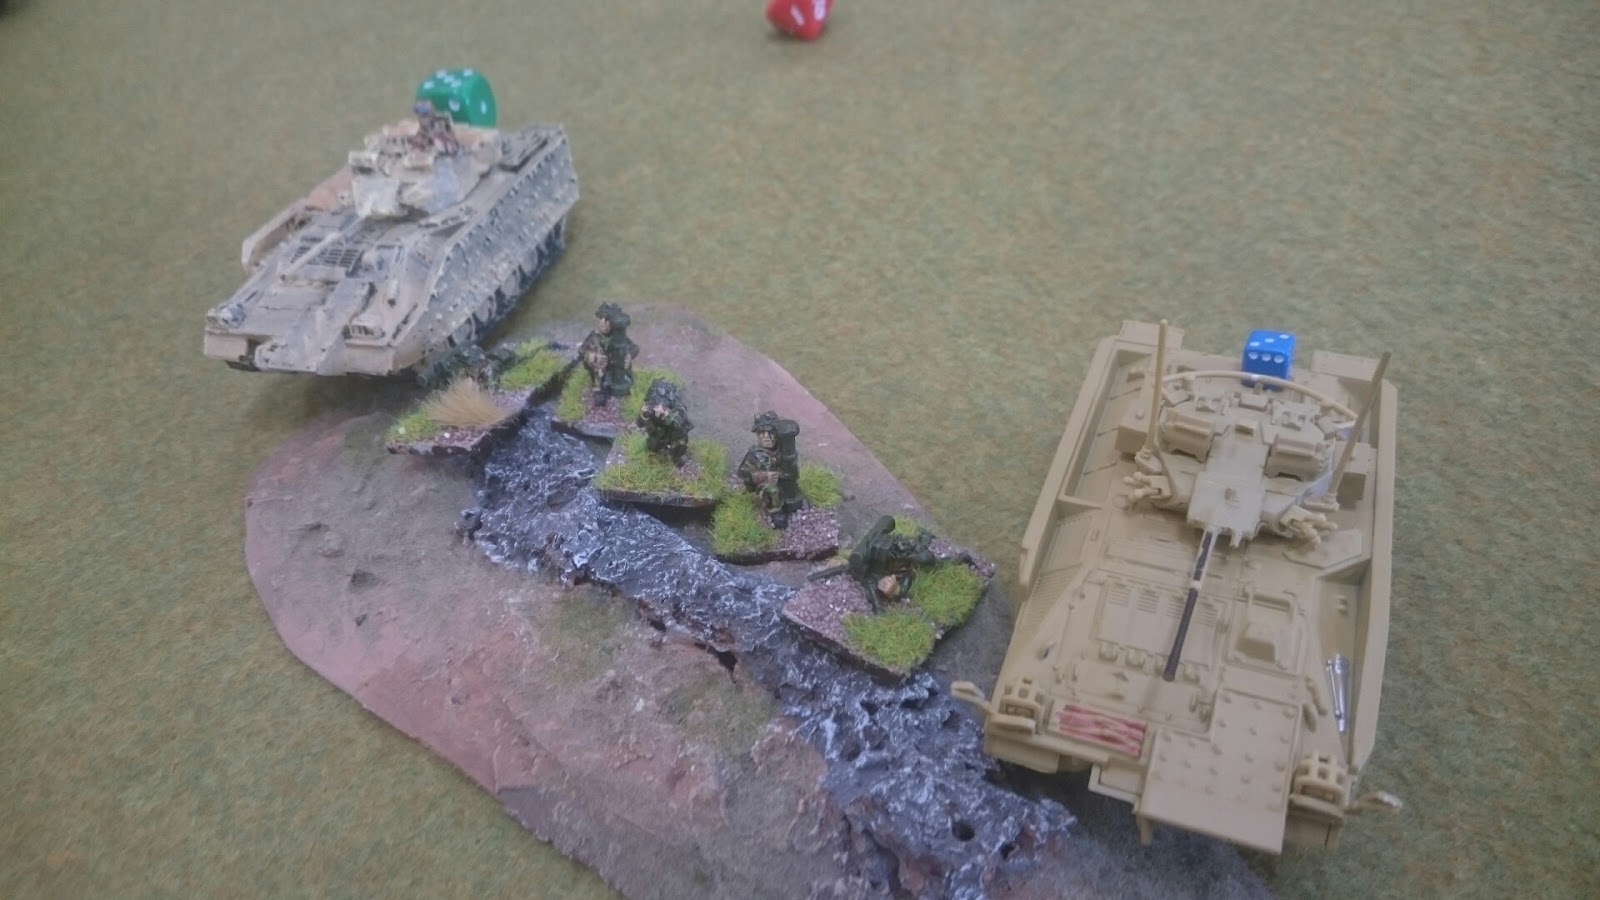
A British Infantry Section use the cover of the abandoned train to get closer to the Russian positions.

The T62 takes up position in a small copse next to the level crossing.

Meanwhile the VDV head for the railway cutting.
British Milan ATGM teams deploy on a small ridge overlooking the road from the level crossing to the crossroads near the village.

The British Infantry Section moves to the other side of the railway line.

The British HQ team deploy on a hill overlooking the crossroads near the village as another Warrior with an Infantry Section on board nears the crossroads. (Photo - Andy C)

The other Warrior heads over the road and takes up a position covering the approaches to the village. (Photo - Andy C)

The British Milan teams spot a tank in the distance. (Photo - Andy C)

Mistaking it for a Mujahedeen IS-3 they launch.

The Russian T62 having moved from its position in the small copse by the level crossing takes two direct hits. I think the British spotter needs to go to Specsavers looks nothing like an IS-3!

Over at the railway cutting one VDV section takes up position at the top of the embankment while another section moves towards the cabbage field on the outskirts of the village.

As the Russians approach the cabbage fields in the distance the lead British Warrior spots a Mujahedeen Armoured Car lurking in the corn field. 30mm shells rip through the target destroying it. (Photo - Andy C)

Not a great start for the Mujahedeen defenders.

The Warrior accompanying the left flank of the British platoon crosses the railway near the abandoned train.

British Infantry from the lead Warrior approach the village only to be cut down under a hail of automatic weapon and heavy machine gun fire. Six dead and two wounded!

The section comes under continued fire from the village.

The lead Russian BMD-1 reaches the cabbage field.

In the village the IS-3 takes up a position ready to fire at the lead British Warrior.

Unseen by the British a brave RPG-7 armed Mujahedeen has crept into the copse near the crossroads and prepares to fire.

Unfortunately the IS-3 beats him to it and the lead British Warrior is hit and destroyed. (Photo - Andy C)

The lead British Warrior explodes after being hit by an AP shell from the IS-3 in the village. (Photo - Andy C)

In the midst of the battle small groups of civilians started to appear around the village.

Were they just civilian or were they a threat to the British and the Russians. The British decided to shoot first and ask questions later. The civilians had information on the whereabouts of the KH-11 Satellite but they didn't live to tell their tales. The British were taking no chances.

Mujahedeen reinforcements arrive in the shape of two more IS-3 MBT's.

They are straight into the action destroying the BMD-1 attempting to enter the village. Some of the VDV troops on board manage to escape the burning wreckage.

Russian reinforcements arrive. A T55 MBT and a BRDM-1 armoured car move up the road towards the level crossing.

The Andreivian Government force finally arrives on table and immediately one of their Chieftains discovers the crashed KH-11 Satellite.

An Andreivian T34 APC moves towards the crash site to attach tow ropes. Two vehicles would be required to haul the Satellite from its crater.

All this activity attracted the attention of the two IS-3's who moved into firing positions.

An AP shell from one of the IS-3's takes out one of the Andreivian Chieftains. The recovery operation is not going well as one of the T34 APC's, being used to tow the Satellite, is also hit and is immobilised. A valiant effort by the crew saw them fix the engine and get the APC started so it could assist the other APC in towing the Satellite from the board.

The remainder of the VDV force still hold both embankments at the railway cutting but unfortunately events conspired against them and they were unable to get to the Satellite first. Rather than take further casualties the Russian commander decided to remain in the relative safety of the railway cut. (Photo - Andy C)

The IS-3 decides to venture outside the village and immediately comes under long range fire from a British Challenger 1 that has entered the table. The IS-3 is hit and explodes in a fireball! (Photo - Andy C)

As the IS-3 burns the Andreivian forces can be seen in the distance retrieving the Satellite. At this point the game ended.
Final Positions.
The Andreivians managed to retrieve the Satellite, despite losing both their Chieftain tanks. But under orders from their President they were forced to hand it over to the British forces. The Russians made slow progress and unfortunately timed there assault on the village at the same time two IS-3's entered the fray. The VDV live to fight another day! The Mujahedeen fought well and held the village despite being attacked by both the British and the Russians during the game, although I am not sure they are happy about their location being revealed to NATO forces. How long before NATO return in force? The British took heavy losses initially but ultimately they secured the Satellite.
Summary.
This was my first go at umpiring a game at Crisis Point and while I wasn't completely up on all the rules I was pleased with how it went as we managed to get through 13 turns and play to a conclusion. This was helped by the decision this year to not go to the pub for lunch, which meant we had more playing time available. Thanks to all the players who helped to keep the tempo of the game going which meant we got far more turns in than previous years. Special mention to Arthur and Leo, two young wargamers, who commanded the Andreivians admirably. Thanks to Rob for the scenario idea which worked a treat although unfortunately his car broke down on the way and he missed the weekend. Finally I must say a big thank you to Andy C for both the use of some of his superb figure collection and also for the use of some of his photos to fill in the gaps.
MORE ON DAY ONE AND A REPORT ON DAY TWO TO FOLLOW.
As always thanks for looking - Richard P
A great game, I enjoyed it enormously. Thanks for umpiring it, it really made the pace of the game pick up - can't believe we got through so many turns and it was great to play through to a conclusion.
ReplyDeleteCheers, Andy
Thanks Andy, I was really pleased with how it went and also how many turns we got through. Definitely a scenario idea to keep for the future.
DeleteCheers
Richard P
Added a link to Andy C's blog with another great AAR of this game.
ReplyDeleteCheers
Richard P